blogging from my phone. one color challenge will be up as soon as i can get the post to work. i suspect my computer is harboring an evil fairy.
loving everyone's pieces so far. sadness my blog is bereft of the color yellow.

Saturday, May 5, 2012
Tuesday, May 1, 2012
Etsy Update: Destash and New Bracelets

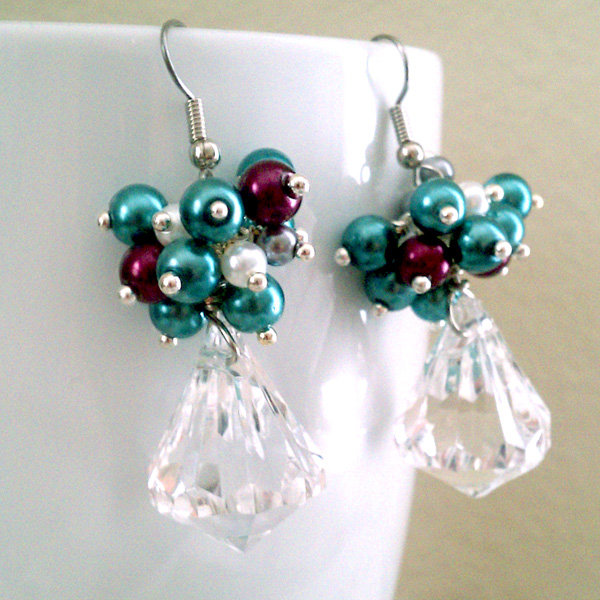
With these ones, to be specific.


I also updated the destash section of my shop. Quite a few mags and used books are looking for new homes.

Maybe this dragon needs a new home too?

Happy Tuesday, loves!
Friday, April 27, 2012
My Tip for Easy Clusters
Let me be honest. I avoided making huge full clusters until just last
year. They just seemed like too much work. I mean, these look like they took forever!:


Maybe I'm just lazy, but the idea of all those dangles... I used to shudder at the thought. Not because I don't have the patience to sit and wire wrap. I love wire wrapping! But when I first thought of doing clusters, the process of making one dangle, attaching it to the piece, make another dangle, attatch it to the piece... rinse, repeat... that's what made me run!
Not anymore.
I work in an assembly line style when doing clusters, now.

1) Estimate how many beads you want for your cluster and slip each of them onto their head pins. Try not to overestimate so we don't waste any head pins (I forgot to take a picture of this step).
2) Take your chain-nose/flat-nose pliers and bend each of the head pins at right angles near the bead. Notice, this is the first step to making a loop.
3) Grab your round-nose pliers and make all your loops. In the picture above, I made wrapped loops.
4) Snip the excess wire for all your dangles.
5) Tuck the pointy bit into the wrap (again, forgot to take picture).
If you notice, each step has it's own pair of pliers associated with it... except the first step, which requires no pliers. Because you're not constantly setting down and picking up a new pair of pliers, it cuts down on the time it takes to make the dangles.
 Now, the fun part for me is assembling the cluster. For the above earrings, I took a jump ring and attached half my dangles, my wire wrapped briolette, the second half of clusters, and then the earring wire.
If the cluster looked thin, I could always attach more. But if it was too full, I'd have to take the dangle off and kill the head pin which always seems like such a waste.
Another idea for clusters is to string them onto a head pin like in these earrings below:
 For these, I used an onyx drop on a gunmetal head pin. I strung my dangles on top and then a gunmetal round. Then, holding the round flush against the dangles, I made a wrapped loop to hold the round in place. The round is nice and tight against the dangles. This keeps the dangles in place and looking full. It gives the earrings a nice cluster cap.
I also love the look a strung cluster of dangles. Or clusters on a chain! When I make chained clusters, I make simple loops instead of wrapped and it's still rather beautiful.
Hope these tips help you when making clusters! Please don't hesitate to ask me questions! I'll answer them if I can :)

Maybe I'm just lazy, but the idea of all those dangles... I used to shudder at the thought. Not because I don't have the patience to sit and wire wrap. I love wire wrapping! But when I first thought of doing clusters, the process of making one dangle, attaching it to the piece, make another dangle, attatch it to the piece... rinse, repeat... that's what made me run!
Not anymore.
I work in an assembly line style when doing clusters, now.

1) Estimate how many beads you want for your cluster and slip each of them onto their head pins. Try not to overestimate so we don't waste any head pins (I forgot to take a picture of this step).
2) Take your chain-nose/flat-nose pliers and bend each of the head pins at right angles near the bead. Notice, this is the first step to making a loop.
3) Grab your round-nose pliers and make all your loops. In the picture above, I made wrapped loops.
4) Snip the excess wire for all your dangles.
5) Tuck the pointy bit into the wrap (again, forgot to take picture).
If you notice, each step has it's own pair of pliers associated with it... except the first step, which requires no pliers. Because you're not constantly setting down and picking up a new pair of pliers, it cuts down on the time it takes to make the dangles.
If the cluster looked thin, I could always attach more. But if it was too full, I'd have to take the dangle off and kill the head pin which always seems like such a waste.
Another idea for clusters is to string them onto a head pin like in these earrings below:
I also love the look a strung cluster of dangles. Or clusters on a chain! When I make chained clusters, I make simple loops instead of wrapped and it's still rather beautiful.
Hope these tips help you when making clusters! Please don't hesitate to ask me questions! I'll answer them if I can :)
Thursday, April 26, 2012
5 Tips on Designing Clusters
[For the Wrapped, Stacked, and Layered Challenge post, click HERE]
It's such a deliciously gray day today. And made even more wonderful by the fact that I slept for 5 hours straight last night. You have no idea how wonderful it is for me to sleep through the night. And right now, I'm enjoying a huge cup of coffee and a cheese danish. My hope is that I will stay awake all day and tire myself out so that when it's time for bed, I'll have another restful night.
But now I'm rambling. This post is supposed to be about clusters!

1) Using balled headpins for your clusters adds a lot of depth to your clusters. Sometimes, clusters can look flat. By bringing in the color of the metal you are using into your clusters, it can break up the clumps of colors and give it depth.
2) Different shapes make your clusters interesting! Experiment with different size beads. Use rondelles and cubes with your rounds. Bring a few 4mm beads to play with your larger ones. Try some bicones!
3) Decide on a dominant color for your cluster. Play with that color by adding beads in different shades.
4) When I find a color I like, I try to pick 2 or 3 "pop colors," as I like to call them. These are colors that go well with the dominant color but just POP in the cluster. Colors can help determine the "feel" of your piece- Is it "elegant?" "Hippie?" "Casual?"
5) Don't be afraid of texture. Mix wood and gemstones. Add some fiber beads. Depending on how much you play with texture will also help give your piece a certain "feel."
Bonus Color Notes!
-If you don't have balled head pins or want to try something different, add seed beads to the ends of your head pins. This can add tons of fun interest.
-I LOVE Czech glass beads. Some fire polished beads can come in more than one color. Using these can open up so many exciting doors with color play.
I have another little tip about putting together these fun little clusters, but I'll wait until tomorrow. For now, I'll leave you with some lovely examples of clusters (with one of my own in as well :P).


Tuesday, April 24, 2012
Our Day Off
[For the Wrapped, Stacked, and Layered Challenge post, click HERE]
Before I lost my job, the boyfriend and I made frequent trips to LA and Pasadena. Our day-trips were put on hold when Borders closed and we haven't really had one since because the drive and eating out is so expensive. Yesterday, we decided to have a mini-day-trip and drive up the coast a little.

We were in Newport and Huntington Beach for a while. It was a very cloudy day (even misty at times) and chilly. I wanted to see if there were any shops I could aspire to selling my jewelry in but most of the shops we saw weren't very handmade-friendly.


More on those earrings in another post.
I love day-trips. As our luck is slowly starting to turn, I'm hoping we can have more of them. Eventually, I think we want to move to Pasadena or somewhere thereabouts. That's where he lived for a while and where I always want our day-trips to take us.
Do you like day-trips? Do you do a lot of research before heading out or just get in the car and drive? Do you have a special place you love going?
Saturday, April 21, 2012
Wrap, Stacked, and Layered Challenge
[Wordy and picture heavy... sorry! Scroll down toward the bottom for the completed stack if you wanna skip over the story... I don't mind... promise! :-)]

The big reveal is here! Tracy Statler over at makebraceletsblog.com put together this lovely blog hop challenge of putting together a collection of bracelets that wrap, stack, and layer. Wrapped, stacked, and layered bracelets are all the rage right now. I don't make many bracelets for myself so I took this challenge to create a collection of bracelets just for me!
The challenge:
-Gather bracelets, making at least one or two, into a new and wonderful collection of decadent arm candy!
-The minimum was 3 bracelets total, but the more the merrier.
-"Have fun and mix colors, textures, and different materials." = Straight from Tracy's post about the challenge!
-And of course, photograph said bracelets!
 Here we go! (Sorry in advance for the long story :P)
To tell you the truth, I completely forgot about this challenge until Tracy sent out the reminder email 11 days ago. Things have been really crazy on my end with sales picking up (YAY!) and new designs spilling out of my head. I remember clearly the morning I got the email. I had a rough night of no sleep, a common enough thing lately but that morning was really really rough. I happened to go on Facebook and watched this video of an Alzheimer patient listening to music and just coming alive at the sound of his favorite songs. This video had me in tears and missing my grandfather. He died just a few years ago and every now and then, I get hit with a massive wave of longing to see him and hear his voice. He wasn't really there toward the end of his life. It was very sad and I was very angry Alzheimer's. But every time he relearned my name, he would sing the song "Rose Marie." And when my mother put music on for him, he would sway in his wheelchair and sing and hum with the music. It was such a beautiful thing.
I finally fell asleep that morning around 9am and woke at noon after dreaming I was back in my grandfather's garden, picking broccoli with him. You see, he was an agricultural professor in the Philippines and loved plants and nature. And I like to think I get that from him.
My hand reached for my phone, as it always does every morning, to check my email and there was Tracy's reminder email. And I knew, just knew, one of my bracelets was going to feature natural beads to remind me of my Lolo.
 These are big-leaf maple tree seed beads. They're made from actual seeds. I bought these beads thinking of my Lolo and have been waiting for the perfect project to work them into and this challenge was it.
 I knew I wanted to use some of the silk sari ribbon I bought a few weeks ago. The rolled ribbon has such a beautiful, colorful, and organic look to it. I used some waxed Irish linen cord as my anchor cords, a coconut disk and crystal rondelle for a clasp, and made some square knots for this bracelet. If you need a tutorial for a square knot bracelet, Rebecca wrote a lovely tutorial for Art Bead Scene you should check out! For the hole for the coconut disk to slip into, I just did two over hand knots leaving a space for the clasp to slide into.

Playing off of the colors of my first bracelet, I knew I wanted to have something with a little more sparkle. Something with way more color to it because while the ribbon I used is very colorful, the strips I ended up using didn't have much variation.
 So, I grabbed a bunch of seed beads for color...
 ... and some silver star dust beads for some sparkle (along with some peridot chips... my birthstone, btw :D)...
 ... added some memory wire and made myself a second bracelet! The seed beads I used here are size 8. Some are silver lined some are matte and with the sparkly star dust beads and organic peridot chips, this bracelet is so fun! I love the texture and the sparkles.
 I added a leaf charm and Czech glass flower to throw in a bit more of my nature theme into the bracelet.
Now, with the two bracelets together, I wanted to do a quick wrap bracelet.
 Take some embroidery floss (I chose to use 2 colors here), some size 6 seed beads, and a size 3.75 hook and you can whip up a quick and colorful wrap bracelet. I didn't really follow a tutorial for the beaded crochet chain. I just sorta winged it. I'm sure if you Google "crochet bead chain," you'll get some really awesome tutorials.
 I chose purple for this because I think that's the color that's missing from my collection of bracelets.
Now...
 ... add 2 old silver bangles from my jewelry collection and you get...
 It's a bit messy, but I love it.
 And it feels great on my wrist. Very comfy and so many happy colors.
Here's a list of all the lovely participants! Happy hopping!

The big reveal is here! Tracy Statler over at makebraceletsblog.com put together this lovely blog hop challenge of putting together a collection of bracelets that wrap, stack, and layer. Wrapped, stacked, and layered bracelets are all the rage right now. I don't make many bracelets for myself so I took this challenge to create a collection of bracelets just for me!
The challenge:
-Gather bracelets, making at least one or two, into a new and wonderful collection of decadent arm candy!
-The minimum was 3 bracelets total, but the more the merrier.
-"Have fun and mix colors, textures, and different materials." = Straight from Tracy's post about the challenge!
-And of course, photograph said bracelets!

To tell you the truth, I completely forgot about this challenge until Tracy sent out the reminder email 11 days ago. Things have been really crazy on my end with sales picking up (YAY!) and new designs spilling out of my head. I remember clearly the morning I got the email. I had a rough night of no sleep, a common enough thing lately but that morning was really really rough. I happened to go on Facebook and watched this video of an Alzheimer patient listening to music and just coming alive at the sound of his favorite songs. This video had me in tears and missing my grandfather. He died just a few years ago and every now and then, I get hit with a massive wave of longing to see him and hear his voice. He wasn't really there toward the end of his life. It was very sad and I was very angry Alzheimer's. But every time he relearned my name, he would sing the song "Rose Marie." And when my mother put music on for him, he would sway in his wheelchair and sing and hum with the music. It was such a beautiful thing.
I finally fell asleep that morning around 9am and woke at noon after dreaming I was back in my grandfather's garden, picking broccoli with him. You see, he was an agricultural professor in the Philippines and loved plants and nature. And I like to think I get that from him.
My hand reached for my phone, as it always does every morning, to check my email and there was Tracy's reminder email. And I knew, just knew, one of my bracelets was going to feature natural beads to remind me of my Lolo.


Playing off of the colors of my first bracelet, I knew I wanted to have something with a little more sparkle. Something with way more color to it because while the ribbon I used is very colorful, the strips I ended up using didn't have much variation.


Now, with the two bracelets together, I wanted to do a quick wrap bracelet.


Now...


Here's a list of all the lovely participants! Happy hopping!
makebraceletsblog.com
ahteesblog.blogspot.com [YOU ARE HERE] :)
songbeads.blogspot.com
sadafulee.blogspot.com
beadlolabead.blogspot.com
stringsattachedcindi.blogspot.com
carolynscreationswa.blogspot.com
cathiecarroll.blogspot.com
pinterest.com/chrisdeweerd
beatnheart.blogspot.com
storiestheytell.blogspot.com
tellyourgirlfriends.com
mamasgottodoodle.blogspot.com
copperdiem.blogspot.com
copperpennydesigns.blogspot.com
greenshoot.blogspot.com
twentytwelve-mmxii.blogspot.com
delle56.blogspot.com
elizabeth-marengoalhajas.blogspot.com
treasures-found.blogspot.com
erinsiegeljewelry.blogspot.com
ferrarioriginalsyahoocom.blogspot.com
facebook.com/handcraftedserenity
PaisleyDesignStudios.com
pixiloo.blogspot.com
hintjewelry.blogspot.com
silverrosedesigns.blogspot.com
daisychaindesignsjewellery.blogspot.com
jazzierich.blogspot.com
site.jkdjewelry.com/blog
jeanetteblix.com
glassaddictions.com
jerrisjems.com
howienjoylife7997.blogspot.com
overthemoon-design.com
katerichbourg.com
pinterest.com/kk0725/stack-it-up-bracelets/
kimmykats.com
kymhunterdesigns.blogspot.com
lamplightcrafts.blogspot.com
lelamccracken.blogspot.com
etsy.com/shop/goingtribal
inspiredadonments.blogspot.com
lorelei1141.blogspot.com
freshbakeddesigns.wordpress.com
lindysdesigns.blogspot.com
maryhardingjewelrybeadblog.blogspot.com
maureenmeanswell.blogspot.com
maybejustperhaps.blogspot.com
beadrecipes.wordpress.com
tekaandzoe.blogspot.com
miri100.blogspot.com
melissameman.blogspot.com
kenshostudio.com
beadingbymalindekoning.blogspot.com
havanabeads.blogspot.com
eclecticteaenshrinements.blogspot.com
roxidesigns.blogspot.com
stefaniessammelsurium.blogspot.com
thestudiosublime.com
sandivolpe.com
sharondriscoll.blogspot.com
sedillohillstudio.blogspot.com
sunshinebliss.com
sharonsjewelrygarden.blogspot.com
MiShelDesigns.com
aujourlejour-shelly.blogspot.com
blueberrycrazy.deviantart.com/gallery
uniqueboutique-creativetouch.blogspot.com
starhitchedwagon.blogspot.com
terrabeadworks.com
theresestreasures59.blogspot.com
sweetbeadstudio.com
missyrappaport.blogspot.com
mylifeunderthebus.typepad.com
fredbeansnook.com/blog

Lolo, Lola, and me. Miss you so much.
Friday, April 20, 2012
Me and My Sketchbook

I've been using my sketchbook a lot lately.

Lot's of new jewelry designs leaving my pen.

And the best part is actually bringing those sketches to life.

I love it.
Subscribe to:
Posts (Atom)