Showing posts with label clusters. Show all posts

Friday, April 27, 2012

My Tip for Easy Clusters

Let me be honest. I avoided making huge full clusters until just last year. They just seemed like too much work. I mean, these look like they took forever!:


Maybe I'm just lazy, but the idea of all those dangles... I used to shudder at the thought. Not because I don't have the patience to sit and wire wrap. I love wire wrapping! But when I first thought of doing clusters, the process of making one dangle, attaching it to the piece, make another dangle, attatch it to the piece... rinse, repeat... that's what made me run!

Not anymore.

I work in an assembly line style when doing clusters, now.


1) Estimate how many beads you want for your cluster and slip each of them onto their head pins. Try not to overestimate so we don't waste any head pins (I forgot to take a picture of this step).

2) Take your chain-nose/flat-nose pliers and bend each of the head pins at right angles near the bead. Notice, this is the first step to making a loop.

3) Grab your round-nose pliers and make all your loops. In the picture above, I made wrapped loops.

4) Snip the excess wire for all your dangles.

5) Tuck the pointy bit into the wrap (again, forgot to take picture).

If you notice, each step has it's own pair of pliers associated with it... except the first step, which requires no pliers. Because you're not constantly setting down and picking up a new pair of pliers, it cuts down on the time it takes to make the dangles.

Now, the fun part for me is assembling the cluster. For the above earrings, I took a jump ring and attached half my dangles, my wire wrapped briolette, the second half of clusters, and then the earring wire.

If the cluster looked thin, I could always attach more. But if it was too full, I'd have to take the dangle off and kill the head pin which always seems like such a waste.

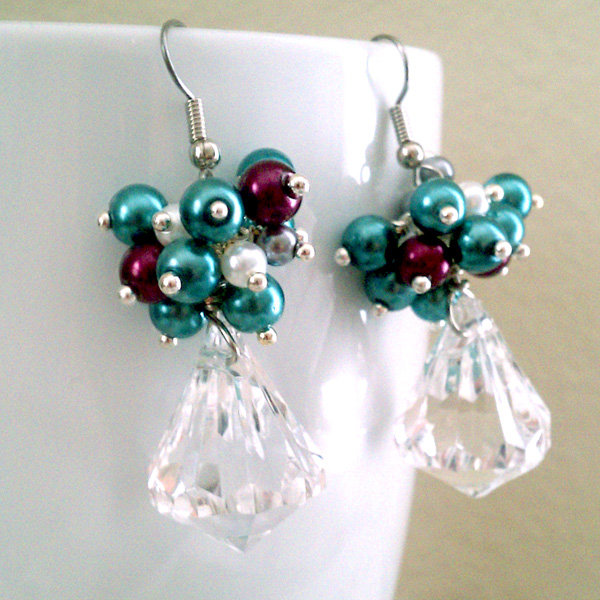
Another idea for clusters is to string them onto a head pin like in these earrings below:

For these, I used an onyx drop on a gunmetal head pin. I strung my dangles on top and then a gunmetal round. Then, holding the round flush against the dangles, I made a wrapped loop to hold the round in place. The round is nice and tight against the dangles. This keeps the dangles in place and looking full. It gives the earrings a nice cluster cap.

I also love the look a strung cluster of dangles. Or clusters on a chain! When I make chained clusters, I make simple loops instead of wrapped and it's still rather beautiful.

Hope these tips help you when making clusters! Please don't hesitate to ask me questions! I'll answer them if I can :)


Thursday, April 26, 2012

5 Tips on Designing Clusters

[For the Wrapped, Stacked, and Layered Challenge post, click HERE

It's such a deliciously gray day today. And made even more wonderful by the fact that I slept for 5 hours straight last night. You have no idea how wonderful it is for me to sleep through the night. And right now, I'm enjoying a huge cup of coffee and a cheese danish. My hope is that I will stay awake all day and tire myself out so that when it's time for bed, I'll have another restful night. 

But now I'm rambling. This post is supposed to be about clusters!

After my day-trip on Monday with the boyfriend, we settled into Starbucks and proceeded to use up the stores of inspiration we gathered on our adventure. I sketched out and made the earrings above and while making these earrings, my brain came up with some design tips I'd like to share with you.

1) Using balled headpins for your clusters adds a lot of depth to your clusters. Sometimes, clusters can look flat. By bringing in the color of the metal you are using into your clusters, it can break up the clumps of colors and give it depth.

2) Different shapes make your clusters interesting! Experiment with different size beads. Use rondelles and cubes with your rounds. Bring a few 4mm beads to play with your larger ones. Try some bicones!

3) Decide on a dominant color for your cluster. Play with that color by adding beads in different shades.


 4) When I find a color I like, I try to pick 2 or 3 "pop colors," as I like to call them. These are colors that go well with the dominant color but just POP in the cluster. Colors can help determine the "feel" of your piece- Is it "elegant?" "Hippie?" "Casual?"

5) Don't be afraid of texture. Mix wood and gemstones. Add some fiber beads. Depending on how much you play with texture will also help give your piece a certain "feel."

Bonus Color Notes!
 -If you don't have balled head pins or want to try something different, add seed beads to the ends of your head pins. This can add tons of fun interest.
-I LOVE Czech glass beads. Some fire polished beads can come in more than one color. Using these can open up so many exciting doors with color play.

I have another little tip about putting together these fun little clusters, but I'll wait until tomorrow. For now, I'll leave you with some lovely examples of clusters (with one of my own in as well :P).